|
Myriota Flex SDK 2.6.0
|
|
Myriota Flex SDK 2.6.0
|
The Myriota Flex SDK provides all the tools and boilerplate necessary to develop ultra-low-power, satellite-connected IoT applications for the Myriota FlexSense device.
FlexSense is a rugged, off-the-shelf hardware platform that enables bi-directional, direct-to-orbit (D2O) satellite communications with advanced sensing and power management features.
Detailed setup instructions are outlined in the following sections:
PATH variable to include the toolchain. i.e. Add export PATH="/opt/gcc-arm-13_2_1/bin:${PATH}" to your ~/.profile or wherever you configure your environment variables for your given shell.Install the correct Python environment with:
To build applications using a DevContainer on Windows, you should first install VSCode. When you open the Flex SDK folder in VSCode it should direct you through the steps that are required to set up your DevContainer. Once you have the DevContainer open in a terminal, you will be able to perform the build instruction.
Codespaces is a cloud development environment provided by Github. Further information on how to use Codespaces is available in the Github documentation.
libflex.a and system_image.bin binaries must be downloaded and installed in the correct location to perform a build.Downloading and installing the libflex.a and system_image.bin binaries can be achieved by running the following command:
The following build instructions assume your current working directory is the project root. Configure the build with the following command (this only needs to be run once):
--cross-file ./flex-crossfile.ini otherwise the build will fail.To assist development where a GPS signal is difficult to obtain, for example, in an indoor environment, the Flex SDK provides the skip_gnss option.
By default, the skip_gnss option is disabled. To enable this option in the build, add -Dskip_gnss=true in the setup step, before building:
skip_gnss option is disabled (set to false), to ensure the correct operation of the FlexSense device.The FlexSense has BLE support that allows the user to use Myriota's FlexAssist Mobile Application to program the device and fetch device diagnostic and configuration parameters. The Flex SDK provides the ability to disable this functionality via the disable_ble_adv option.
By default, the disable_ble_adv option is disabled. To enable this option in the build, add -Ddisable_ble_adv=true in the setup step, before building:
After the setup has been completed, a build is performed by running the commands:
[!IMPORTANT]
After building the source, the following binaries will be generated in the
build/directory:
user_application.no_network_info.bin – Production-ready firmware without network info. user_application.with_network_info.bin – Firmware with merged network information.
Each example follows the same naming convention as the user application, e.g.: analog.no_network_info.bin and analog.with_network_info.bin.
examples directory.To perform a pristine build, delete the build folder before running the Setup and Setup commands again.
Programming a FlexSense device requires the flashing of three separate images:
BLE Firmware or ble_firmware.bin (Once per SDK version) System Image or system_image.bin (Once per SDK version) User Application or user_application.with_network_info.bin
There are multiple options for programming your FlexSense device.
The instructions below outline how to program the System Image and User Application via the command line.
The following programming instructions assume your current working directory is the project root. To program the System Image, run:
To program the User Application:
Programming the FlexSense requires Python version 3.10 or greater.
The following instructions can be used to install Python on a Windows platform.
Install Python:
Then navigate the Flex SDK project's root directory, and run the following:
The following programming instructions assume your current working directory is the project root. To program the System Image, run:
To program the User Application, run:
The following programming instructions assume your current working directory is the project root.
Create the virtual environment:
Activate the virtual environment:
Your shell should now be prefixed with (.venv)
To program the System Image:
To program the User Application:
Myriota DeviceAssist is a desktop tool that supports the following functionality across the Myriota product range that is available from the Tools section of the Myriota Support Site
Instructions on how to program the Device using DeviceAssist can be found in the DeviceAssist User Guide located at the same location as mentioned above.
The FlexAssist Mobile Application, available on Android and iOS, features a Downloads tab in the bottom menu.
The latest firmware can be downloaded from the Downloads tab, which saves the files on your device so that they can be programmed onto a device where there may not be network connectivity.
Once your FlexSense is powered on, you will be able to connect to it and program it with the downloaded firmware on the System Update tab.
One of the key benefits of FlexSense is its ultra-low power design, enabling years of battery life on a pair of AA Alkaline cells. However, verifying that your firmware is behaving as expected and allowing the FlexSense to enter its low-power modes requires measuring current draw directly.
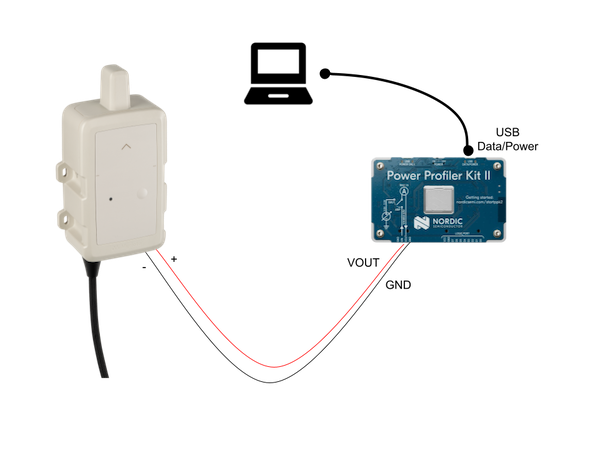
This section guides you through using a Nordic Power Profiler Kit II (PPK2) to observe the actual power profile of your FlexSense firmware and verify that the device enters low-power sleep between jobs.
The following is the wiring diagram to perform the current draw measurement using a PPK2.
Source Meter| State | Current (typical) | Description | Duration |
|---|---|---|---|
| Soft Off | 1uA - 2 uA | This is the current expected when the FlexSense is powered, but the button has not been pressed for the first time | Until the button is pressed |
| Wake Up and GNSS Fix | 5mA - 2A | The device is executing its boot procedure and acquiring a GNSS fix | 90s to 120s |
| BLE Advertising | 0.5mA - 2mA | The BLE is advertising, and the device can be connected to in the FlexAssist Mobile App | 60s |
| Sleep | less than 10uA | The FlexSense is in Low Power mode | Until next Job |
| Symptom | Likely Cause | Potential Fix |
|---|---|---|
| Sleep current greater than 10 µA | GPIO or peripheral leakage | Confirm that where Init API functions were used, De-Init functions were called before a job is finished. |
| Sleep current greater than 100uA | BLE advertising not switched off | Confirm that no devices are connected to the FlexSense via Bluetooth, as this will keep the BLE on. |
| Sleep current never below 1mA | The Device is not entering Sleep mode | Confirm that there are no loops or functions in your user application that will keep a job from ending and allowing the system to enter Sleep mode. |
To view debug information and information you have printed out in your user application, connect FlexSense to your PC via USB.
Open a terminal with the following configuration:
| Parameter | Value |
|---|---|
| Baud Rate | 115200 |
| Parity | None |
| Flow Control | None |
| Data Bits | 8 |
| Stop bits | 1 |
Device Output tab.You can monitor both pre-built and user-defined diagnostics at any time with the FlexAssist mobile application.
These are updated in real-time; any change written by the user application is reflected immediately within the app.
These values are updated only when:
| Issue | Suggestion |
|---|---|
| GNSS doesn't get a Fix | Ensure the FlexSense is deployed with sufficient sky view (Refer to the FlexSense User guide) |
| I2C communication to an external sensor is not working | Ensure the cable length from the FlexSense to the I2C Sensor is no more than 1 meter (3 feet) |
| Unexpected device prints in the terminal or Device Output tab of Device Assist | Ensure that the BLE firmware and System image are the latest versions available from the Device Manager and that the user application is built with the latest Flex-SDK version available |
If you require further assistance, please submit a ticket.